今回は、射影変換(台形補正)のやり方を解説します。
射影変換とは、任意の四角形から別の四角形に変換することを言います。
今回解説する内容は、台形型に撮影された矩形を長方形に変換するという内容となります。
「ココナラ」でC#、OpenCvSharpを使った画像処理アプリの作成を行っています。
もし、作成依頼やお困りごとがあればお気軽にご相談ください!
前準備
「OpenCvSharp4.Windows」と「OpenCvSharp4.Extensions」をインストールします。
インストール方法はこちらの記事の前準備①OpenCvSharp4のインストールをご参照ください。
ソースコード
処理の大まかな流れは下記の通りです。
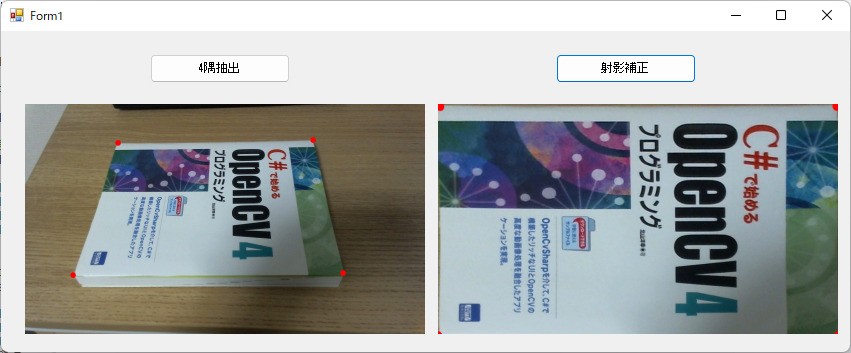
①画像読み込み
②4隅の定義(読み込み画像の4隅)
③クリックにて対象(本)の4隅を設定
④読み込み画像の4隅に対して1番近い座標を検出
⑤射影変換(台形補正)
using System;
using System.Collections.Generic;
using System.ComponentModel;
using System.Data;
using System.Drawing;
using System.Linq;
using System.Text;
using System.Threading.Tasks;
using System.Windows.Forms;
using OpenCvSharp;
using OpenCvSharp.Extensions;
using System.IO;
namespace WarpPerspective
{
public partial class Form1 : Form
{
//クリックした4隅を保持
private List<Point2f> _clickPoints;
//読み込んだ画像
private Mat _srcMat;
//pictureBox1の4隅座標
private List<Point2f> _corners;
private Point2f _topLeft;
private Point2f _topRight;
private Point2f _bottomRight;
private Point2f _bottomLeft;
public Form1()
{
InitializeComponent();
//画像の読み込み
var rootDir = Directory.GetCurrentDirectory();
var fullPath = rootDir + @"\OpenCvSharp4.jpg";
_srcMat = Cv2.ImRead(fullPath);
//PictureBoxのサイズに合わせて表示する
pictureBox1.SizeMode = PictureBoxSizeMode.StretchImage;
pictureBox2.SizeMode = PictureBoxSizeMode.StretchImage;
pictureBox1.Image = BitmapConverter.ToBitmap(_srcMat);
_clickPoints = new List<Point2f>();
//4隅の値を定義(左上から時計回り)
_corners = new List<Point2f>();
_corners.Add(new Point2f(0, 0));
_corners.Add(new Point2f(_srcMat.Width, 0));
_corners.Add(new Point2f(_srcMat.Width, _srcMat.Height));
_corners.Add(new Point2f(0, _srcMat.Height));
}
private void pictureBox1_MouseClick(object sender, MouseEventArgs e)
{
//クリックした座標を追加
_clickPoints.Add(new Point2f(e.X * _srcMat.Width / pictureBox1.Width, e.Y * _srcMat.Height / pictureBox1.Height));
//クリックした点を描画
_srcMat.Circle(e.X * _srcMat.Width / pictureBox1.Width, e.Y * _srcMat.Height / pictureBox1.Height, 11, Scalar.Red, -1);
pictureBox1.Image = BitmapConverter.ToBitmap(_srcMat);
}
private void button1_Click(object sender, EventArgs e)
{
if(_clickPoints.Count < 4)
{
MessageBox.Show("ポイントが足りていません!");
return;
}
//4隅に対して1番近いポイントを検出し、代入する
_topLeft = _clickPoints[SerchNearPoint(_corners[0])];
_topRight = _clickPoints[SerchNearPoint(_corners[1])];
_bottomRight = _clickPoints[SerchNearPoint(_corners[2])];
_bottomLeft = _clickPoints[SerchNearPoint(_corners[3])];
}
/// <summary>
/// 1番近い座標のインデックスを返す
/// </summary>
/// <param name="corner"></param>
/// <returns></returns>
private int SerchNearPoint(Point2f corner)
{
var coordinateList = new List<double>();
foreach (var clickPoint in _clickPoints)
{
var norm = Math.Sqrt((clickPoint.X - corner.X) * (clickPoint.X - corner.X) + (clickPoint.Y - corner.Y) * (clickPoint.Y - corner.Y));
coordinateList.Add(norm);
}
//1番小さいdistanceListのインデックスを返す
return coordinateList.IndexOf(coordinateList.Min());
}
private void button2_Click(object sender, EventArgs e)
{
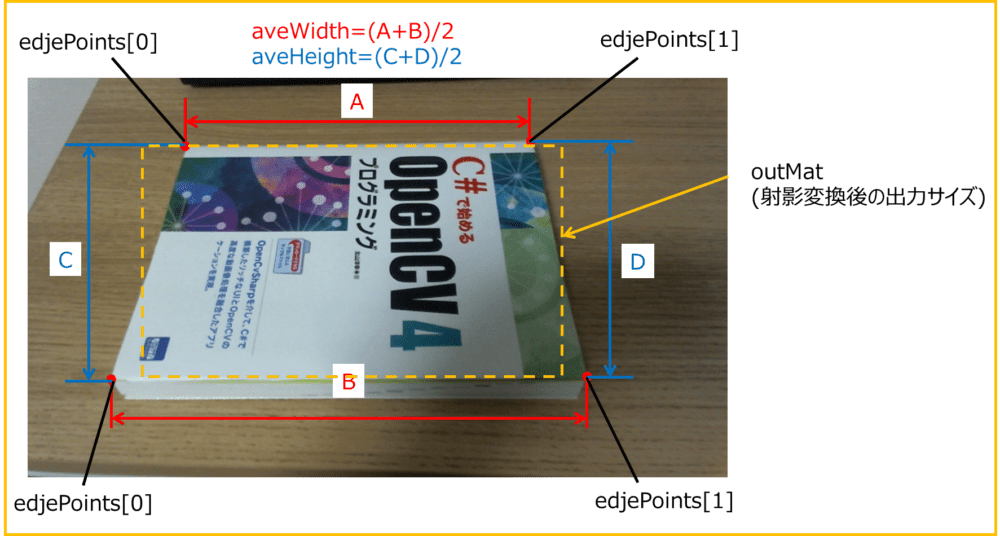
//出力サイズを決めるために平均を取得
var aveWight = ((_topRight.X - _topLeft.X) + (_bottomRight.X - _bottomLeft.X)) / 2;
var aveHeight = ((_bottomLeft.Y - _topLeft.Y) + (_bottomRight.Y - _topRight.Y)) / 2;
//検出した4隅の配列作成
var edjePoints = new Point2f[]
{
new Point2f(_topLeft.X,_topLeft.Y),
new Point2f(_topRight.X,_topRight.Y),
new Point2f(_bottomRight.X,_bottomRight.Y),
new Point2f(_bottomLeft.X,_bottomLeft.Y),
};
//出力サイズの配列作成
var outPoints = new Point2f[]
{
new Point2f(0,0),
new Point2f(aveWight,0),
new Point2f(aveWight,aveHeight),
new Point2f(0,aveHeight),
};
//射影変換用の行列作成
var transMat = Cv2.GetPerspectiveTransform(edjePoints, outPoints);
var outMat = new Mat(new OpenCvSharp.Size(aveWight, aveHeight), MatType.CV_8UC3);
//射影変換
Cv2.WarpPerspective(_srcMat, outMat, transMat, outMat.Size());
pictureBox2.Image = BitmapConverter.ToBitmap(outMat);
}
}
}①画像の読み込み~④読み込み画像の4隅に対して1番近い座標を検出
①~④までの処理はこちらの記事に解説があるので、詳細はご確認ください!
⑤射影変換(台形補正)
射影変換の詳細の流れは下記の通りです。
1.上下、左右の辺の長さの平均を出し、変換後の出力サイズを決める
2.検出した本の4隅を配列にする
3.射影変換用の行列を作成(Cv2.GetPerspectiveTransform)
4.射影変換(Cv2.WarpPerspective)
第1引数:ImputArray src 元画像
第2引数:OutputArray dst 出力画像
第3引数:ImputArray m 行列変換
第4引数:OpenCvSharp.Size dsize 変換後の画像サイズ
行列変換mを作成するためにCv2.GetPerspectiveTransformを使用します。
第1引数:IEnumenable<Point2f> src 変換前の座標配列
第2引数:IEnumenable<Point2f> dst 返還後の座標配列
private void button2_Click(object sender, EventArgs e)
        {
            //1.出力サイズを決めるために平均を取得
            var aveWight = ((_topRight.X - _topLeft.X) + (_bottomRight.X - _bottomLeft.X)) / 2;
            var aveHeight = ((_bottomLeft.Y - _topLeft.Y) + (_bottomRight.Y - _topRight.Y)) / 2;

            //2.検出した4隅の配列作成
            var edjePoints = new Point2f[]
            {
                new Point2f(_topLeft.X,_topLeft.Y),
                new Point2f(_topRight.X,_topRight.Y),
                new Point2f(_bottomRight.X,_bottomRight.Y),
                new Point2f(_bottomLeft.X,_bottomLeft.Y),
            };

            //出力サイズの配列作成
            var outPoints = new Point2f[]
            {
                new Point2f(0,0),
                new Point2f(aveWight,0),
                new Point2f(aveWight,aveHeight),
                new Point2f(0,aveHeight),
            };

            //3.射影変換用の配列作成
            var transMat = Cv2.GetPerspectiveTransform(edjePoints, outPoints);
            var outMat = new Mat(new OpenCvSharp.Size(aveWight, aveHeight), MatType.CV_8UC3);

            //4.射影変換
            Cv2.WarpPerspective(_srcMat, outMat, transMat, outMat.Size());

            pictureBox2.Image = BitmapConverter.ToBitmap(outMat);
        }
C#で画像処理を学ぶためのおススメの書籍
C#でOpenCvを扱う方法などを詳しく解説してくれています。
C#で画像処理を解説してくれている本がほとんどない中、こちらの書籍はいろいろなメソッドの使い方等を事例を交えて解説してくれているため、非常に参考になります。
私はこちらの書籍を参考に画像処理を実装しました。
是非参考にしてみてください。
C#の基本が学習したいという方におススメのスクール:侍エンジニア塾のエキスパートコース